Showing posts with label Unruly PaperArts. Show all posts

Thursday, October 3, 2013

Tim's October Tag!

Each month I so look forward to Tim's new Tags of 2013 and of course loving the Halloween theme, I could not wait to start! Now mostly I followed the guidelines, with a few changes of products I did not have.
Ghoulish fun to create the background! I used stains and inks in place of the paints, why you ask, because I don't have that many of the Distress Paints! If you saw how many paints I have, you would understand why.  
Used different "Tim" stamps for the background stamping.
Don't have the new dies, so improvised using Tim's dies I do have. I just had to give the scary cat and bat some Stickle eyes!  Will also link this up to Unruly PaperArts "RAQ 2" Bats, Our Creative Corner, "Let's Tag It On" and Country View Crafts, "Something Spooky." For the frame, I inked it up with Dusty Concord, applied Glass Bead Gel and then sprinkled on Purple glitter and finished with matte sealer spray after it dried!
Used the "Chit Chat" stickers to finish and some stars I had on hand, which I do need to pick up those glass stars! Note to Tim, need more "happy" in the chit chats! Don't you think we use that word quite often and there were not a one to be found in my two booklets! 

That is that and I thank you for taking the time to stop by today! Have a fabulous day!

Tuesday, September 24, 2013

Mirror, Mirror!

I will start out with an apology, because this will be photo and detailed heavy! SORRY! This project was started last Tuesday and I knew it would be Halloween themed, but was not sure which direction this would take me! I finished this yesterday and no I did not constantly work on it, I am slow, but not that slow. Several months back via my blogger friend Sandra, I learned of this guy named Drew and a technique he uses for mixed media. In recent times, a few of my UK friends have been showing some fabulous artwork after taking a Finnabair workshop, which I believe is similar! Oh how I wish to take one of her workshops!
It started with a cheapy mirror from Ikea and I knew from the beginning I was going to use the Gothic 31 female skeleton for the mirror part, but was not sure how! The first thing I did was to apply various layers of trim and goodies and all that will be explained later and I did actually remember to take some pictures along the way, which is either good or torture for you!
I also took some pictures in different lights to give you an idea. Sadly here in the desert the outside light is very bright and sunny and inside pictures are never that great.
When I was looking at the mirror and trying to think how I would stamp on it, I remember one of Tim's acrylic fragments being about that size and with just a little sanding, it did fit perfectly! This fragment was alcohol inked and at first I used lighter colors and had to switch back to darker colors for the image to show through. After I stamped the image in Black Archival, I quickly removed the ink with a soft cloth for the mirror to reflect through! I love that! To show you how the inset looks without the camera and me in the photo, I place the fragment on a piece of glossy white paper just for photo purposes, it is not backing the fragment.
This process involves using white gesso, adhering items, sprays, stenciling and what have you!  The flower was a leftover piece I had used for something else, which had kind of a faux leather look by the time I finished with it! I do remember I had applied tissue paper to grunge paper.
Added a couple of pins, the owl was a metal sticker and a skeleton, I kind of broke apart (so gruesome).
I had also embossed some spider webbing and torn up some pieces to add and of course no spooky mirror would be complete without spiders, which are shrink plastic. Oh those skulls are a new find at Michael's that came in a bag and I added chain to connect them.
Some metal pieces indicating the strike of midnight and a few extra goodies.
Halloween is not complete without pumpkins, which were also gesso and colored and also highlighted with orange paint. I also stenciled along the side.
The hanging charm was stamped on alcohol inked foil paper, that I added a drop of blending solution in the center and then stamped and embossed the skull with clear EP, added the glass dome and hung it from the key!
My fair which from Haunted Halloween, was colored with Distress inks after stamped in Black Archival.
The graveyard is leftover from another project.
The doll was gifted to me from Brenda and that lovely lace next to the fair witch is a gift from Lucy!
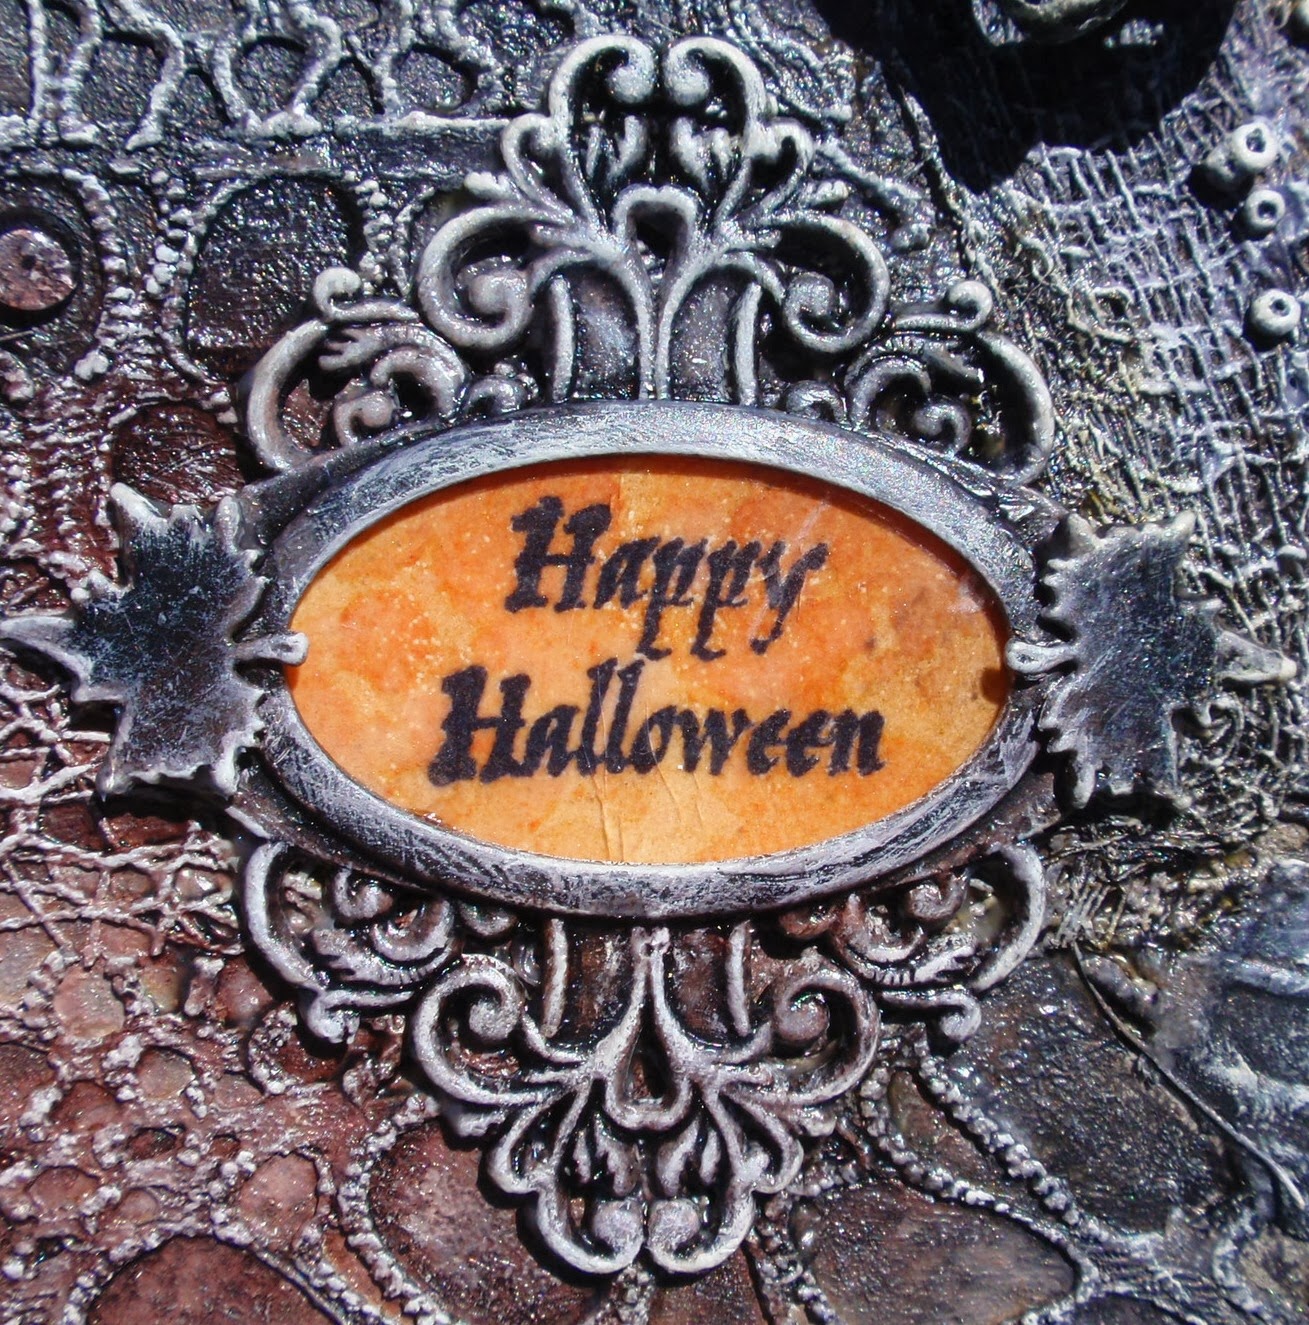
The "Happy Halloween" was stamped, inked and clear embossed and obviously added after all the spraying, inking, painted and what have you!
Fun project, so much fun! There is still some time to enter this month's September Referral Program at Artistic Outpost for a chance at a prize and just remember to use the AO stamps! This will be shared at AO tomorrow if you want to visit and say hello.

This will be finding it's little spooky way over to the following challenges:
Country View Crafts - Layers
Frilly & Funkie - Eat, Drink and be Merry 
Inspiration Journal - Falling for Faux 
Our Creative Corner - Forgotten Things - Mirror, trims and other goodies
Unruly PaperArts - 3-D Wood

Thank you for stopping by today and I hope you enjoyed my project as much as I enjoyed creating it. I am listing below the products and some before pictures with some instructions. Enjoy the week!

Stamps: Artistic Outpost, Haunted Halloween, Gothic 31
Whtie Gesso, Multi Medium, Spray Sealer, Glossy Accents, Trims, Stencils, Gears, Metal, Bones
Inks: Black Archival, Distress Inks: Tattered Rose, Shabby Shutters, Antique Linen, Brushed Corduroy, Wild Honey
Sprays: Adirondack Wild Plum, Butterscotch, Meadow, Espresso, A mix of Dried Marigold, Wild Honey, Spiced Marmalade, Rusty Hinge and Dylusions Black
Alcohol Inks: Black, Espresso, Wild Plum, Lettuce, Sunset Orange

I will do this quickly just to show you the beginning. I applied a coat of Claudine's Multi Medium layered my trims and a few items and then applied a layer of white gesso over that.
Added more items along the way and then did a little stenciling along the way with modeling paste.

Everything is covered in Gesso and left to dry prior to spraying the inks. Once you spray the inks, dry and blot up any excess with a paper towel. Thought I had taken a picture after sprayer, but guess not. Then you highlight with white paint or gesso. These is a step to use black paint, but I have not done this. After all is done, I always spray with a Matt Sealer to keep the colors in place! Here is a video link to Drew's technique.


Friday, May 24, 2013

A Broken Heart!

Obviously this heart is not broken, but it almost happened! Seriously this heart gave me a royal pain in the - you get the picture! Anyway, instead of smashing it to bits and pieces, I walked away from it and just took on a couple of other projects and returned to it and am now pleased! If you don't like it, lie to me, please! There is still one week left to join the current challenge at Fashionable Stamping Challenges "Alter It" and there is a $20 prize to be won from Flonscrafts. Remember we are a stamping challenge blog, so stamping is obviously required and no digi images. If you want to see some really fabulous altered projects, really go see what my DT Sisters have created!
The images I used are Artistic Outpost and were stamped on tissue paper using Black Archival and clear embossed.  BTW, there is a 15% off  Memorial Day sale that is in effect through June 8th! I then colored them on the reverse side using Vintage Photo, Tattered Rose, Barn Door. This was then sprayed with matt sealer. I realized that after I finished my altered heart, that these colored tissue images would really absorb right into the color, so I painted them white on the backside! Well I thought that was quite clever for this old bird!
I won't bore you with the first round of mishaps and there were plenty! Let's just say that I spent the better part of an entire day at the background, quit, went back to it the next day, quit, took a can of "white Kilz" sprayed it and then white gesso and started all over! The thing is that I like what I had down and was not going to quit!
After the gesso treatment, the flowers and other embellishments were adhered with Multi Gel Medium, which I love. The heart was sprayed with Espresso and Butterscotch Color Wash, heat set a bit and blotted up any excess. I also added some shading with Vintage Photo distress in with a wet paint brush here and there. Areas were also covered with crackle and I washed in some thinned white paint.

I added some extra color with Vintage Photo to the flowers and all was highlighted with white gesso.
Don't they make the perfect couple? And the words are Tim's Chit Chat stickers that I distressed with Vintage Photo!  The pearls were cut to fit the open areas and inked with alcohol inks, espresso and butterscotch.
Challenges we are entering:

Country View Crafts - How Does Your Garden Grow
Eclectic Paperie - Gel Medium
Rogue Redhead Designs - May Flowers
Simon Says Stamp and Show - Favorite Ink - Vintage Photo
Unruly PaperArts - RAQ 1 - 5 Or More Flowers

Well that is it for now and I thank you so much for visiting! I plan to enjoy the long Memorial Day weekend with some serious BBQ. Oh and working in organzing my craft room! I gave away a very large duel station exercise gym, which was in another room and now I have a second room to spread out into! Now that is awesome! Have a wonderful weekend whatever you do!

Stamps: Artistic Outpost, SteamPunk, Flapper Fashions
Inks: Black Archival, Vintage Photo, Tattered Rose, Barn Door


Monday, April 15, 2013

Chunky Scarecrow!

This is my first "chunky ATC" and I had quite a good time working on all the various sides.  More and more I am just loving working with Mixed Media and even add a little of my own ideas here and there.  I did once do decorative painting!!  So here it is and what do you think and you know I want to hear it "good or bad."  And a big "thank you" to Diane, who not only told me of a really great picture editing site, "picmonkey," but even told me how to add a watermark!  She is so cool, I tell you! 

All stamps are Artistic Outpost and for this I used the Oz Collage and Industrial Backgrounds.  For the background, after sealing, I applied white gesso and stamped my image to keep in mind where I did not want to apply embellishments or texture!  Next I added modeling paste, let it dry a bit and then pressed in my industrial gears on both sides.  I also ran the VersaMark over the top of the gears background and clear empbossed. Even though I was going to layer some metal gears, I wanted a little texture to show through.  This was all covered with gesso and then sprayed with Dylusions and paints.  After all dried, it was highlighted with gesso and sealed.  The scarecrow was stamped with Coffee Archival and then colored with DI

I knew what I was going to do with the front and back, but was having a bit of a dilemma with the sides.  The stamps I wanted to use were out and then when I visited Shelly's "My Creative Rumblings," I was reminded of a Technique Junkie "chalkboard" technique.  Thanks Shelly as I need that push!!!  The filmstrip was cut from brown card stock and then inked with black and embossed.  I also cut some thin packaging strips to cover the images, just like a real filmstrip!
The wings were crackled and then colored with Distress Stains.  I inked and embossed two gears for a front and back to add extra support.  A little grove was notched and hot glue used to keep it upright and I sure hope it remains like that! 
The back was embossed and inked.  The sentiments were all stamped using Archival and clear embossed on tissue paper, cut and then applied with Multi Medium Gel.  You won't even see the tissue edges, so I like that!  Don't like that my "YBR" decided to be slightly off, but once I noticed, it was too late.  This AO Chunky Scarecrow is off to the following challenges and if you have some of these fabby stamps, don't forget the "April Referral Program." 

Simon Says Stamp and Show:  Background
SanDee & Amelie's Steampunk Challenge: Fairytales into our Steampunk
Unruly PaperArts: Gears
Bloggers Challenge: Emboss Me
The Artistic Stamper - Texture

Thank you so much for stopping by today and I hope you have a very creative week! 

Stamps: Artistic Outpost, Oz collage, Industrial Backgrounds
Inks:  Archival Coffee, Distress Black Soot, Walnut Stain, Vintage Photo, Scattered Straw, Mustard Seed, Rusty Hinge, Tattered Rose, Peeled Paint
Dylusions Melted Chocolate, Cut Grass, Pure Sunshine


Monday, April 8, 2013

Tim's April Tag!

Today it is very windy here and they have warnings about it!  We can get 80 MPH winds and those are dangerous as power poles and trees have been know to give was.   Why am I telling you this, I don't know, but could be because I just thought the door might blow open from a big burst of wind!  Now that I have gotten that out of my system, how about sharing Tim's April 2013 Tag, which will also go for a visit at Unruly PaperArts for "RAQ 2 Gears." 
Followed Tim's instructions as much as I could, but the IMPROVISING took place with the Distress paints as I only have two and none were Metallics.  Pulled out the Distress Stains and Metallic Stains to mix up as well.  I just played until I was somewhat happy!  Could not get the background effect, but can live with what I did!  This tag with be for my Grandson's #22 coming up at the end of April. 
Used Tim's Mini Blueprint and Tiny Things for my tag.  The world and compass was stamped on plastic packaging as again, I did not have the special product!  Added a piece of filmstrip over the postage airplane, which I wished later I had stamped in black as the sepia ink does not show up that well via camera! 
My number was a piece of grunge board that I played with paints and stains until I thought it was close to Tim's.  The metal embellishments were also treated with the paint and stain mix!  Fun tag and always a challenge to come up with the end project with a lack of product!!!! 
A little excitement to share!  I made TOP 3 at Simon Says stamp and show for this AO Canvas!
And TOP 3 at SanDee & Amelie's Steampunk Challenge for this Cuckoo Clock
I just was going to go and pick up the mail and I saw the entire air was brown!  It is so windy here and dirt is making visibility very bad!  No, I left the mail, but here is a picture of what would have been a blue sky day!  I took this out my craft room window!
Sorry, I was so photo heavy!  Hope you are having a great week and with a little less dirt blowing in the air.  I know at least one of my blogger friends is probably dealing with the same conditions!  Thank you for visiting today! 


Thursday, April 4, 2013

Time For A Good Book!

Do you have a difficult time deciding on a post title?  I know at times I sure do and it can take up some valuable time!  My little studious young man from Rogue Redhead Designs, was asking to come out and get all inky, so how could I refuse this little darling?
The arched frame of Tim's was cut using layers of chipboard and corrugated cardboard and then glued together.  This was covered with some paints, crackle and stain.  The back panel is card stock layered on chipboard and I did first splatter some leftover coffee on this!  The young man was stamped in Coffee Archival and then colored with markers and applicators.  He was then masked off and the Almanac background stamped in Brushed Corduroy, inked and splattered with water.
The tag background was inked over a Dylusions letter stencil with a Versamark pad and then clear embossed.  Once colored with distress inks, the embossing was removed via an iron!  Again we had to splatter with water!  I just love that effect!
The sentiment was stamped using Coffee Archival and clear embossed, inked and mounted on corrugated cardboard and I used a Stampin Up paper punch, so neglected!  The key and metal corners were inked and embossed, even though it does not show up very well in the photos! 

This tag will be linked to the following challenges:
Rogue Redhead Designs:  Sentimental Focus
Unruly PaperArts:  RAQ 1 Hardware
Inspiration Journal:  Marvelous Masks/Spectacular Stencils
Simon Says Stamp and Show:  A Very Strict Challenge
Craft-Room Challenge:  In the Library

Hope you are having a very creative week.  This is the first time I have had a chance to play this week!  Taking advantage of working in the yard before it becomes too hot!  Sorry that may have been cruel to hear for some of my friends in the colder climates!  If it helps, I pay for this will bad allergies!!!  Thank you for visiting and whatever you are doing - ENJOY!

Stamps:  Rogue Redhead Designs, Reading Plate
Inks:  Archival Coffee, Distress, Squeezed Lemonade, Brushed Corduroy, Antique Linen, Scattered Straw, Vintage Photo, Walnut Stain
Vintage Photo Stain

Tuesday, January 15, 2013

Joie de Vivre

How is everyone doing so far this year?  Can't believe we are midway through the month of January!  I started this canvas yesterday and had a couple of ideas, not sure what I think about it.  One part of my brain is telling me to add more stamping and I just may do that, so what do you think and be honest with me.  The mixed media art is somewhat new to me, so I am truly open to suggestions!
Revised with a Little Help From my Friends!

 First I painted up my canvas using PaperArtsy Fresco Finish paints, which my dear friend Brenda "Bumblebees and Butterflies" gifted me!  Thank you, Brenda!  I blended these, spayed some water and wiped off some color.  Added crackle and then a coat of a little more green and did some dry brushing with DecoArts Emperor Gold.  Did some stenciling with modeling paste using an older square template from the days of painting and Crafters Work Shop.  I did heat seat the paste, as I do love that raised effect!  These areas were highlighted in gold.  The canvas edges were highlighted with gold and the corner's embossed with Stampendous Aged Gold.  The sentiment was computer generated.  The Eiffel Tower is from Invoke and the background stamps from Tim Holtz.  I cut a piece of lace from a flea market find and embossed that in gold and then added touches of Fresco Paint to give a patina look.  
This canvas will be linked to Unruly PaperArts RAQ2, "Joie de Vivre," Eclectic Paperie's "Get Altered - Using Canvas," and Simon Says Stamp and Show "Lace Love."

Really appreciate your stopping by for a visit and have a great day!

Fresco Finish, Inky Pool, Hey Pesto, Chocolate Pudding, Haystack
Distress Ink:  Tumbled Glass
Archival:  Sepia
Stampendous:  Aged Gold EP
Crackle
Gold Paint


Blog Archive